What is Design Harness? My Practice of Building a Design AI Agent in KinoViz
To put the recently popular Harness into practice, I built KinoViz. The process was indeed tough 😅, but now I can finally produce some decent results. Here are some insights I've gained from product practice, hoping to share and encourage peers.
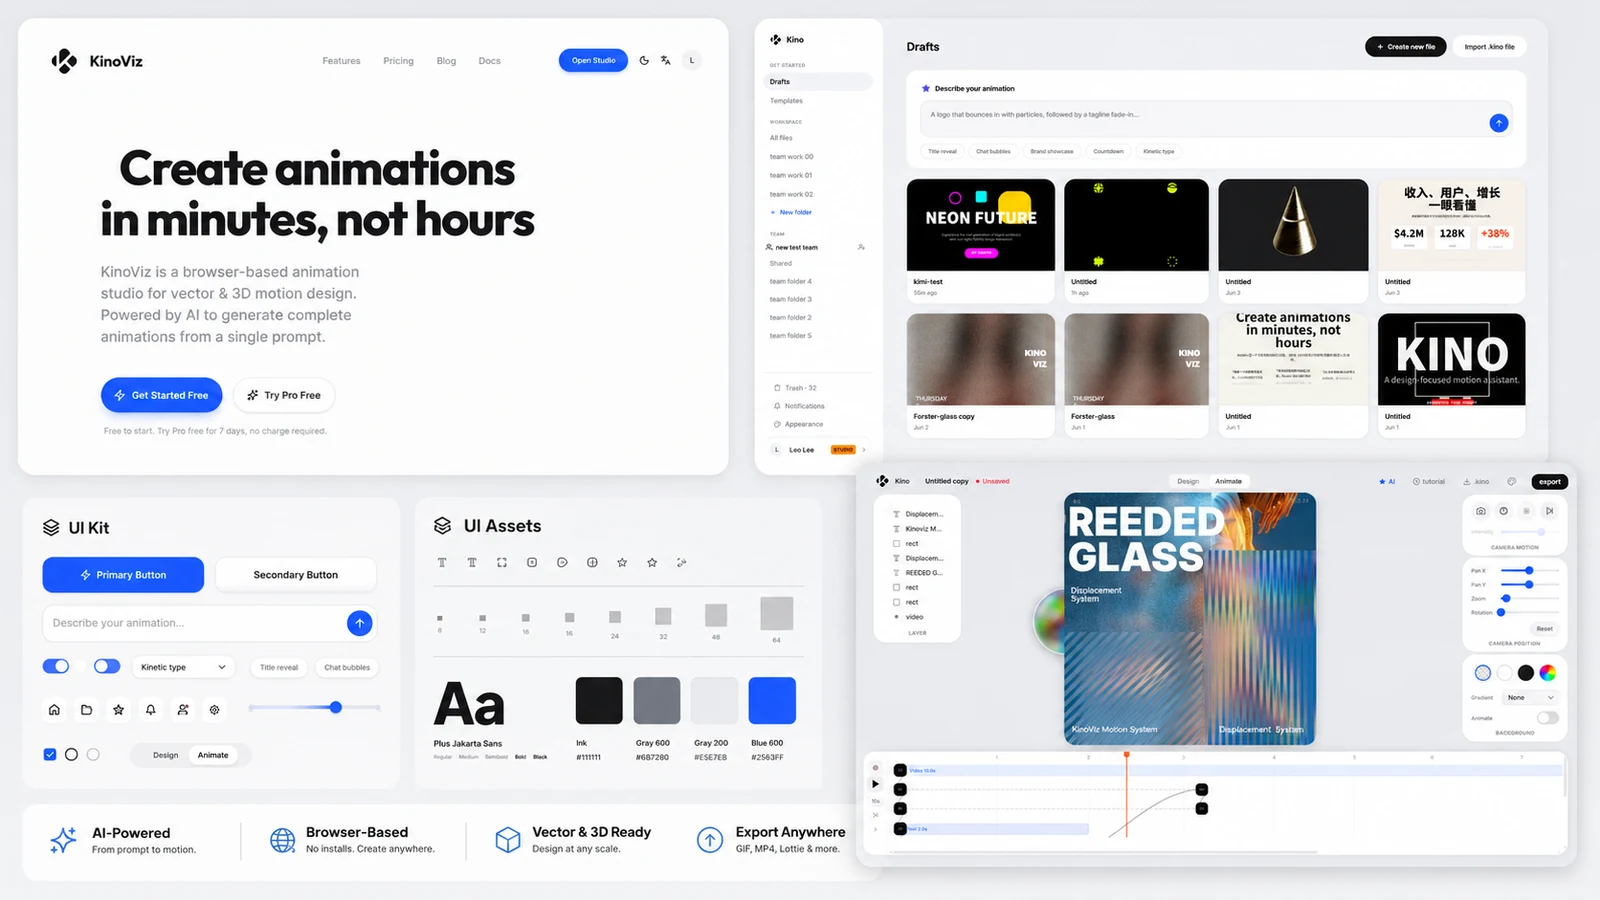
First, Look at What We've Achieved So Far
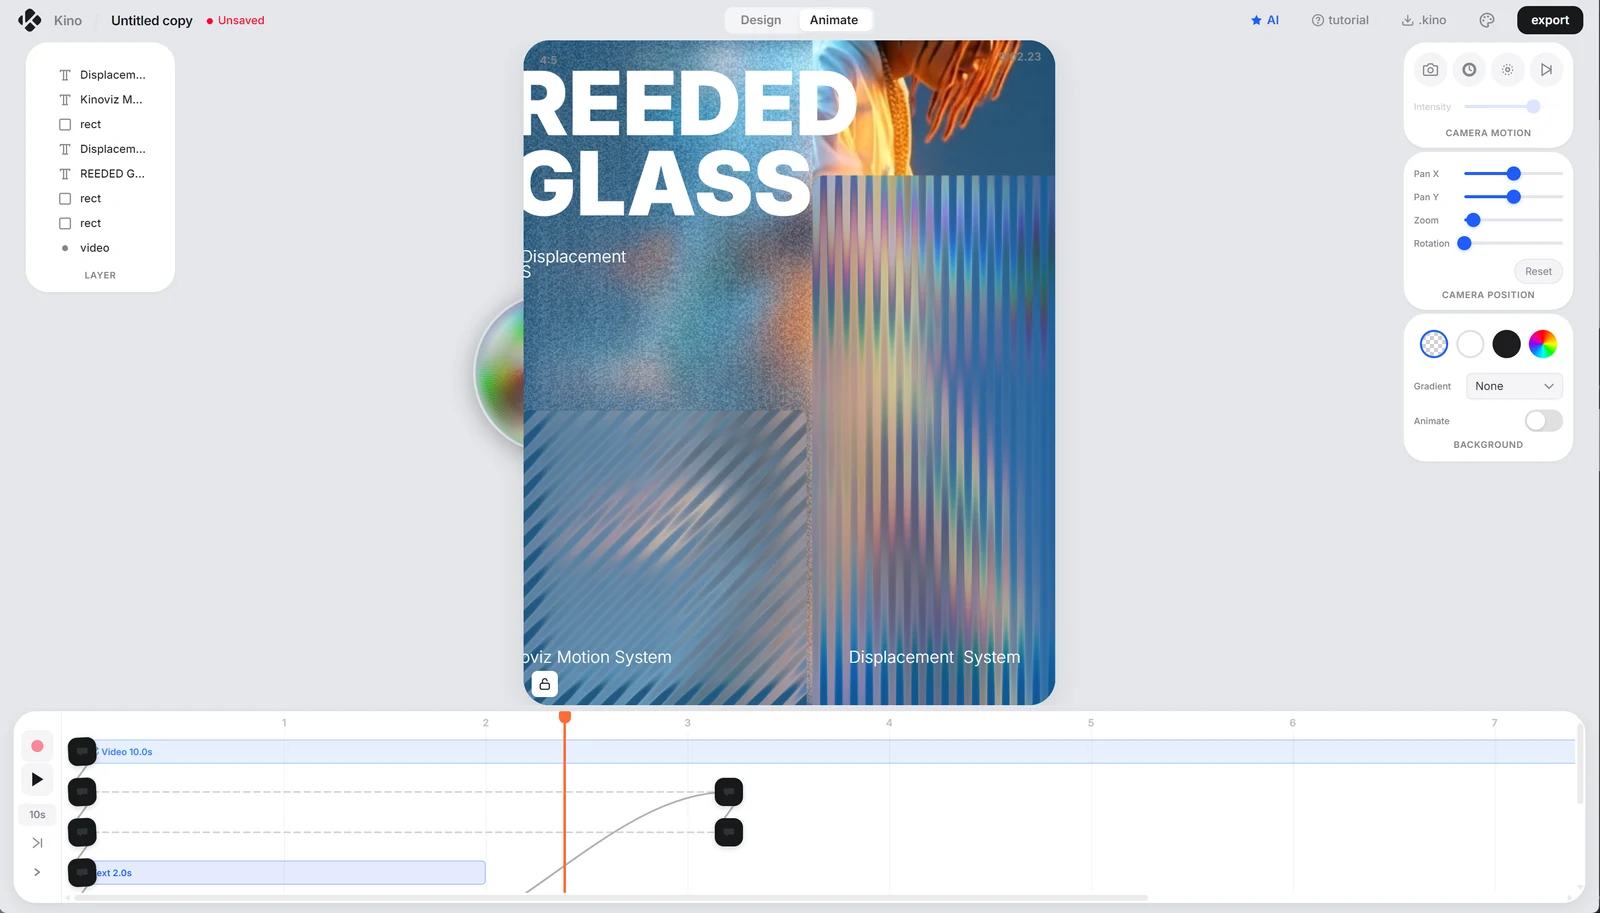

Reference Image Mode: Generating Animations
In my current practice, this type of task requires advanced models like GPT-5.5 or above, or Claude Opus 4.7 or above.

Video demo: Please refer to the animation above.

Video demo: Please refer to the animation above.
Text-to-Animation: Free Creation


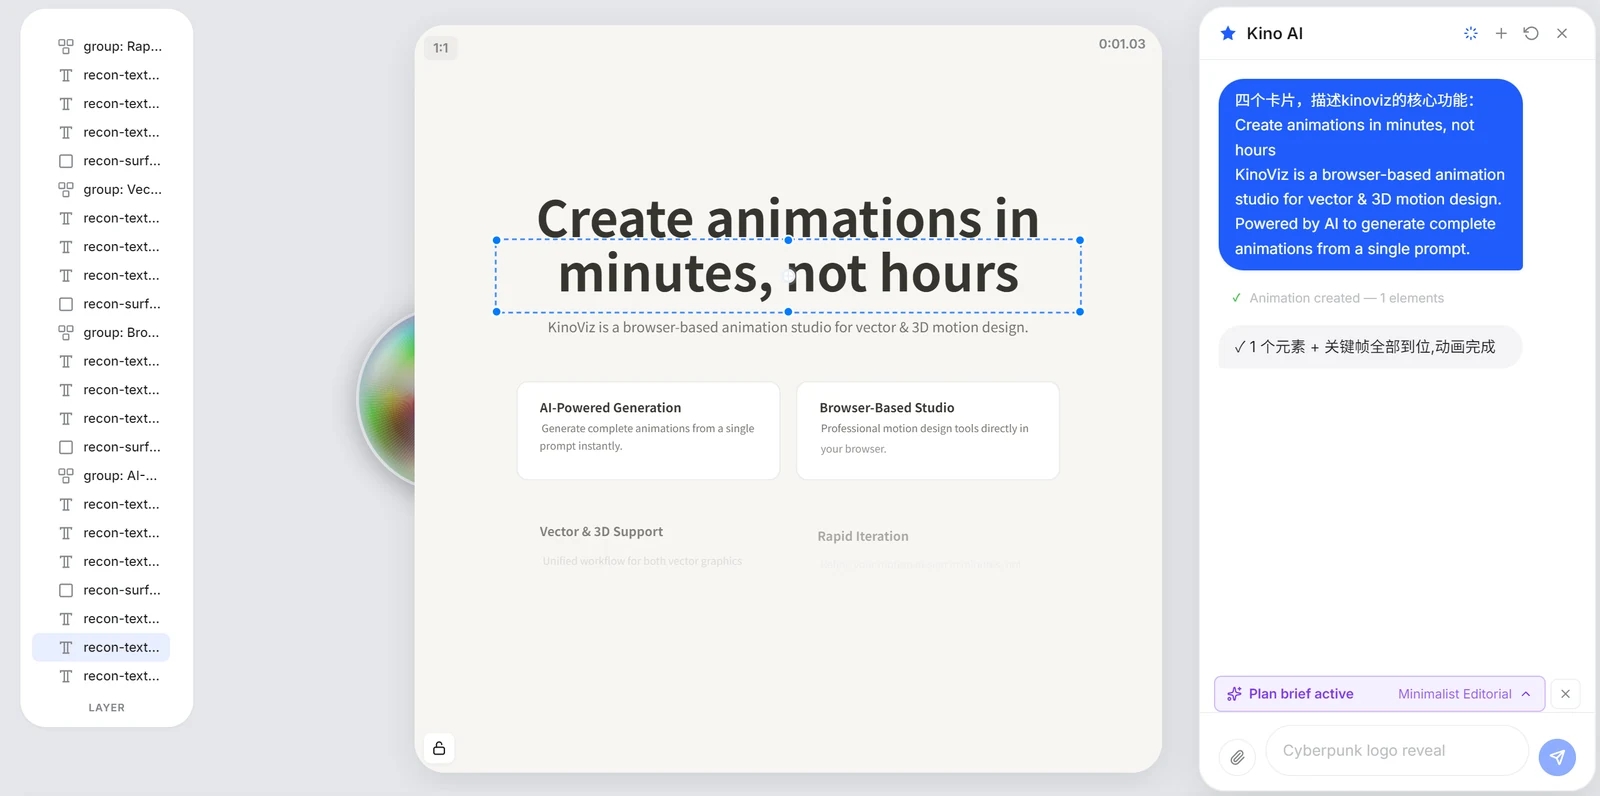
Text-to-Animation: UI Interface
This type of animation is relatively fixed, with defined constraints to prevent the model from diverging arbitrarily


AI Making Animations is Just the Entry Point
If we look at the results first, readers' initial reaction is likely: AI can make animations again.
But what I really want to talk about is not "the model can generate a nice animation."
That's just the entry point.
The truly valuable part is later: after the effect is generated, it is not a static image or a demo you can only watch but not modify. It should still retain layers, characters, color semantics, keyframes, source assets, project state, and rollback paths. Users can edit text, change styles, adjust rhythm, swap assets, and continue having the Agent work on it.
This is what I've been studying recently: Design Harness.
I used to miswrite this term as Hardness. That mistake wasn't entirely off base, because it is indeed very hard. The difficulty is not in getting the model to "produce an image," but in getting the model to enter a real design workflow and consistently deliver editable, verifiable, and continuable results.
In a nutshell:
Design Harness is not about making AI better at "drawing," but about making AI better at "delivering design work."
What Does the Industry's "Harness" Mean When Applied to Design?
DeepSeek's Harness JD has a very straightforward line: Model + Harness = Agent.
Anthropic's article on agent eval has a similar expression: agent harness/scaffold is the system that makes the model act like an Agent, responsible for handling input, orchestrating tool calls, and returning results. The OpenAI Agents SDK documentation defines an Agent as an application that plans, calls tools, collaborates across specialists, maintains state to complete multi-step tasks, and explicitly states that when an application has orchestration, tool execution, approvals, and state, it falls within the realm of the Agents SDK. Google Cloud's breakdown of Agent is also clear: reasoning, planning, memory, tools, plus a certain degree of autonomy.
Translated into the design scenario, these statements boil down to a more specific question:
How does a model go from a vague requirement to a design file that can be further edited and published?
My answer is the following pipeline:
The effect is not the end point. The effect is merely the first screen that makes readers and users willing to keep watching.
A real system should break down backwards from the effect: what is the user's intention, how is the brief formed, where do aesthetic standards come from, how are tools exposed, how does the generated result preserve structure, how is the animation verified, and finally how is it exported and rolled back.
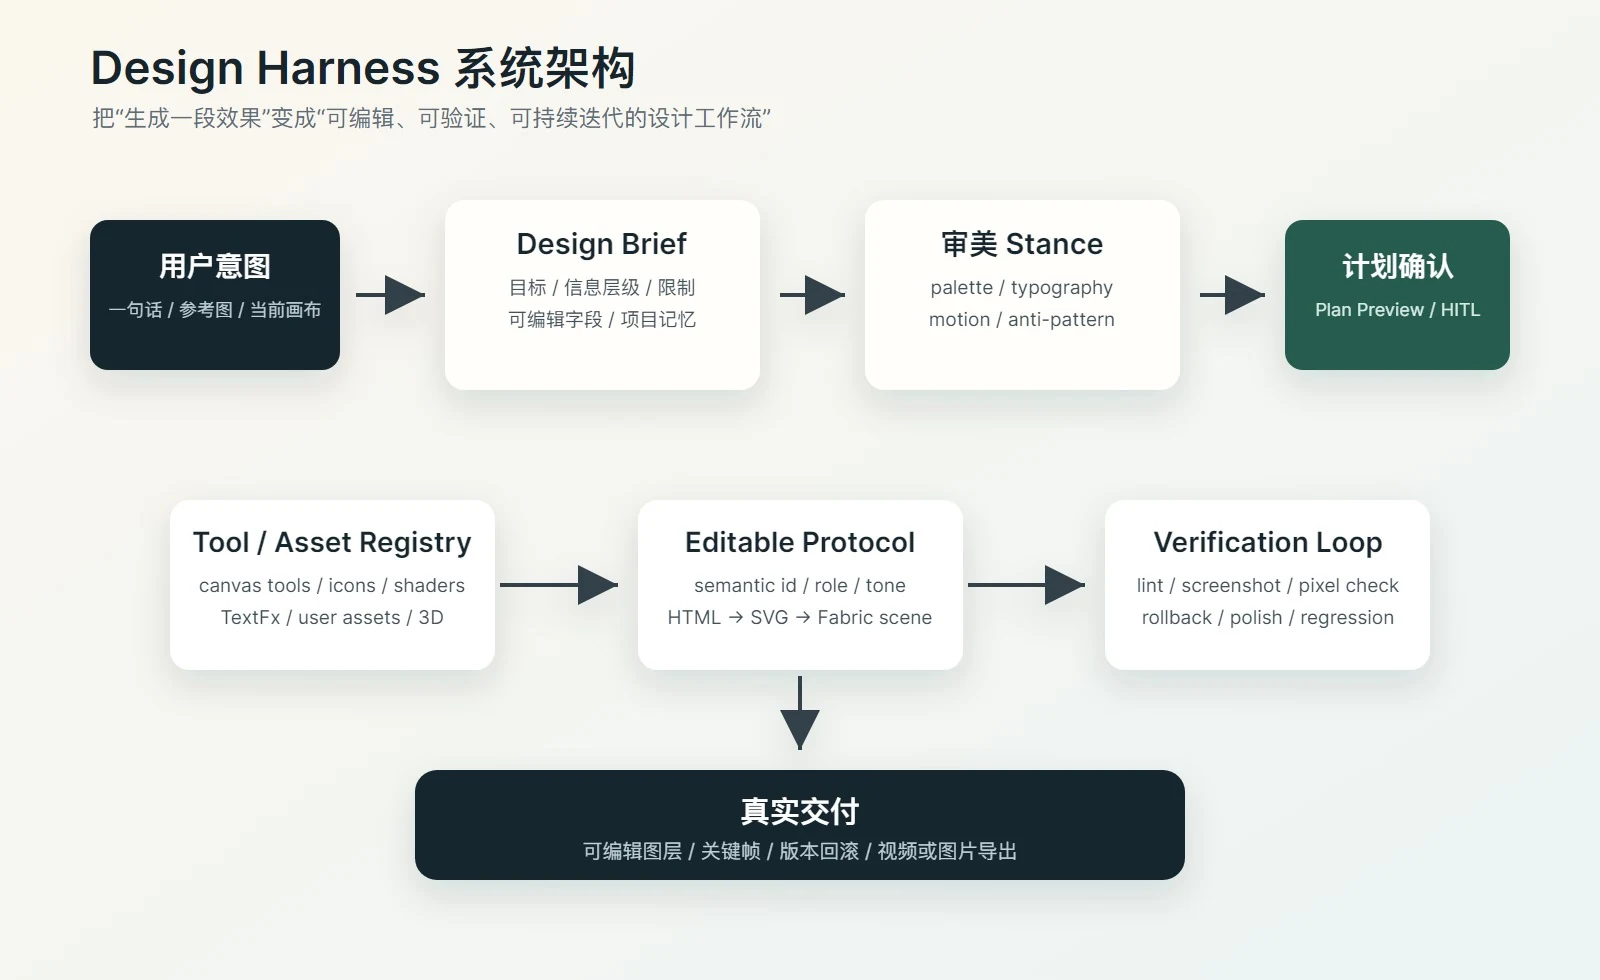
I break it down into six layers:
- User Intention: a sentence, a reference image, the current canvas, historical context.
- Design Brief: turning vague requirements into a contract that both the model and user can inspect.
- Aesthetic Stance: letting the model know "what counts as good," rather than just saying "make it more premium."
- Tool / Asset Registry: letting the model see the real editor capabilities and existing assets.
- Editable Protocol: making the output a structured, editable scene.
- Verification Loop: using rules, screenshots, regression, and manual polish to ensure stable improvement.
These six layers together form Design Harness.
Layer 1: Show the Effect First, But Don't Be Fooled by It
Design-focused AI products are particularly susceptible to being misled by the first-screen effect.
You create a beautiful demo, users get excited, it gets shared in moments, and investors can easily understand it. But once a creation tool enters a real workflow, the first image quickly becomes insufficient.
Users will immediately ask:
Can these words be edited?
Can this button's color be changed?
Can this light effect be dimmer?
Can this element enter 0.2 seconds later?
Can this animation be exported as MP4?
Can this version be rolled back?
So now, when I evaluate an AI design tool, I no longer just look at the first-screen generation effect; instead, I look at how much structure remains in the system after the tenth modification.
If after the tenth modification, the user can still select the headline, change the CTA, swap the palette, adjust keyframes, reuse assets, and re-export, then it shows that Harness has value.
This is also the direction I value most in KinoViz: the effect makes people willing to look first, the structure makes them willing to continue using it.
Layer 2: The Brief is a Contract Between the Model and the Human
User prompts are often too short.
"Create a hello animation."
"Make a fintech hero."
"Generate a more advanced page for me."
These statements are insufficient even for a human designer, let alone a model. The model can only guess. Guessing once is okay, but continuous work will drift.
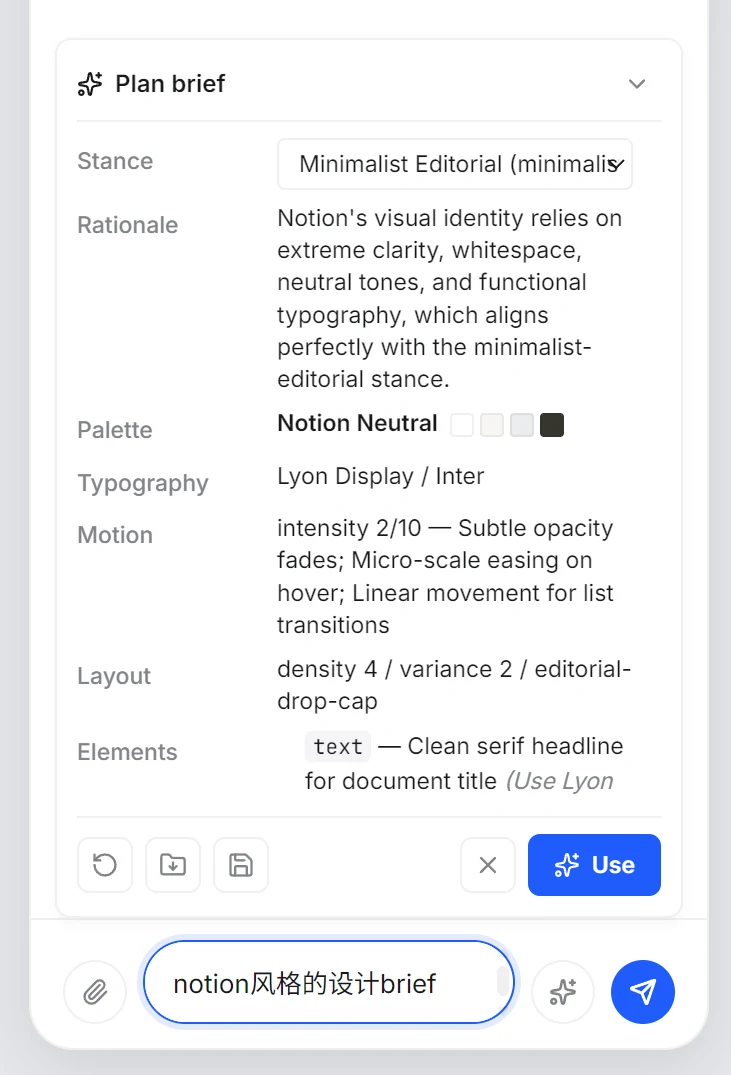
So I turn the raw prompt into an intermediate layer: the Design Brief.
It's not a nice explanation written for the user; it's a contract written for the model, the system, and the user to jointly inspect.
A simplified version of the brief looks something like this:
type DesignBrief = {
  goal: string;
  audience?: string;
  industry?: string;
  stance: "minimalist-editorial" | "glassmorphic-tech" | "kinetic-poster" | string;
  palette: {
    name: string;
    background: string;
    ink: string;
    muted: string;
    accent: string;
    surface: string;
  };
  typography: {
    display: string;
    body: string;
    hierarchy: "editorial" | "dashboard" | "poster" | "product-ui";
  };
  motion: {
    personality: "calm" | "springy" | "kinetic" | "cinematic";
    intensity: 1 | 2 | 3 | 4 | 5;
    maxDurationMs: number;
  };
  layout: {
    density: 1 | 2 | 3 | 4 | 5;
    variance: 1 | 2 | 3 | 4 | 5;
  };
  editableFields: string[];
  constraints: string[];
};
This is not project source code; it's my abstraction of the brief.
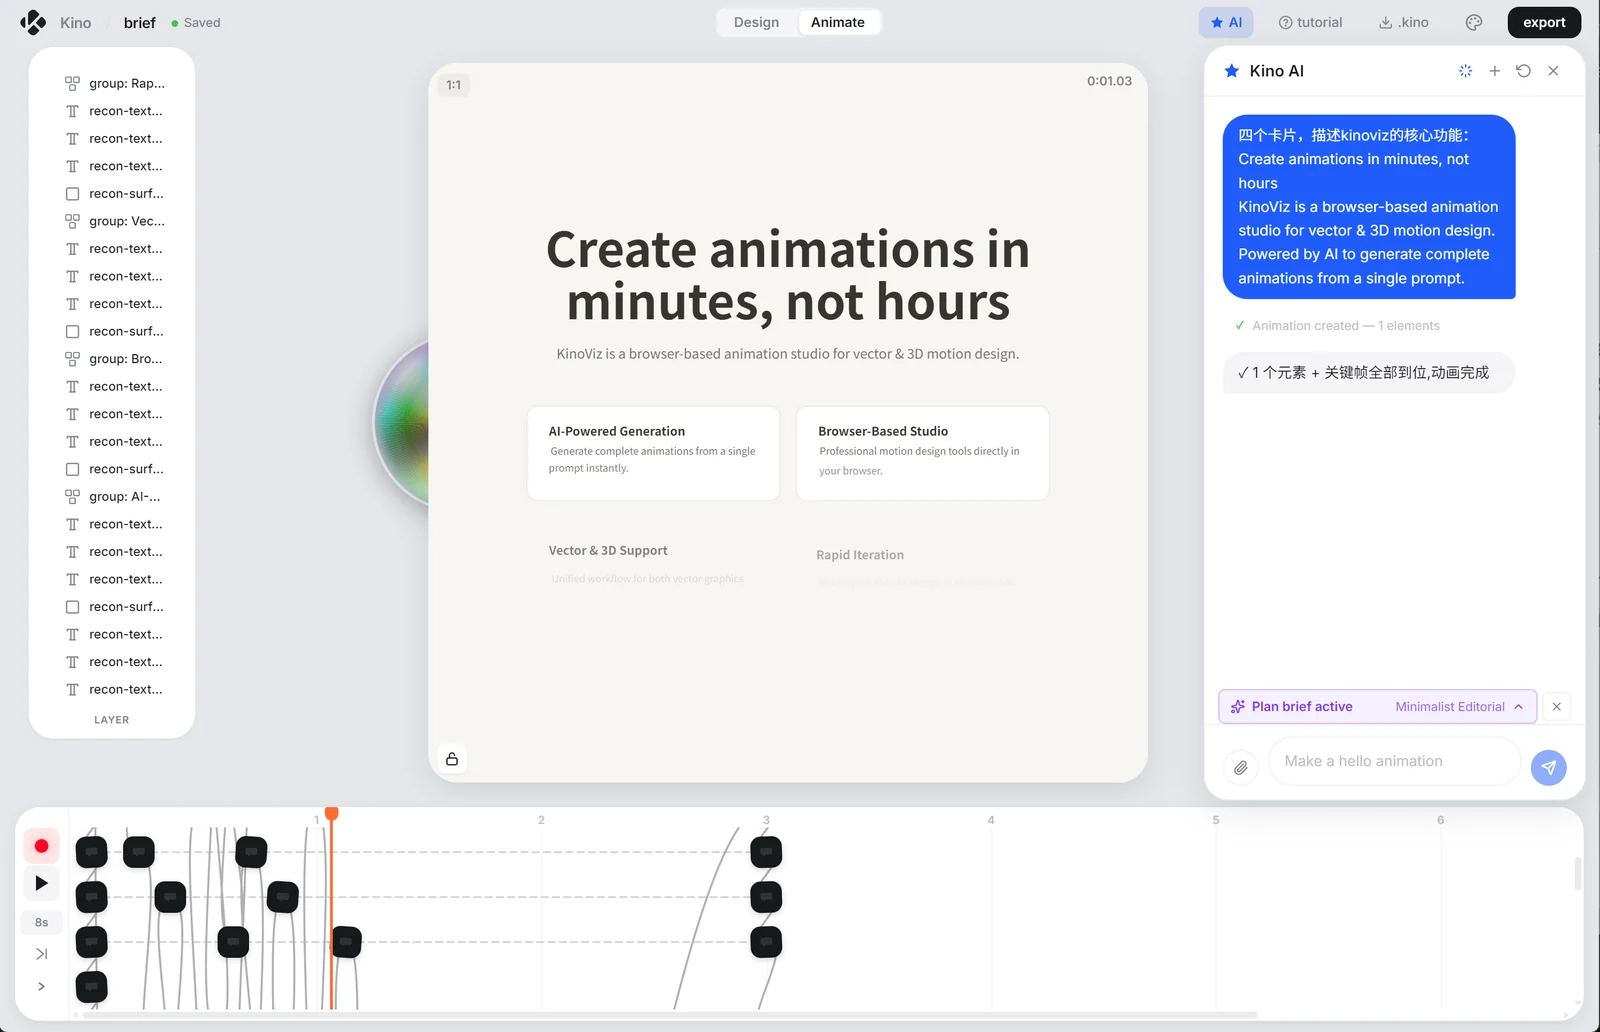
The key point is not the fields themselves, but that it solves three problems.
First, the model doesn't have to re-guess the style every round.
A project-level brief can be persisted. Generate the hero today, change the pricing tomorrow, add stats the day after — the Agent reads the same design intent every round. The pages won't have a different aesthetic per screen.
Second, the user can intervene before generation.
If the model judges the user's request is too vague, it should first provide a Plan Preview instead of directly mutating the canvas. The Plan Preview can include stance, palette, duration, element list, camera angles, and key questions. Only after user confirmation does it execute mutating tools.
Third, it provides a basis for subsequent verification.
If the brief wrote motion.intensity = 2, but the result generates a bunch of violent bounces and flickers, that's not "different aesthetic preferences" — it's a breach of contract.
Many people understand Context Engineering as "stuffing in more context." I now prefer to understand it as "layering the context": which parts are current dialogue, which are project memory, which are lazily-loadable knowledge, and which must be confirmed by the user.
The Brief is the most important contextual middle layer for a design-focused Agent.
Layer 3: Aesthetic Stance — Making "Beauty" Operable

One of the biggest challenges in designing Harness is how to make a model understand beauty.
That sounds esoteric, but it can be broken down engineering-wise.
By default, models are prone to mode collapse. They revert to the safest templates in the training distribution: purple-blue gradients, large rounded cards, emoji icons, generic feature copy, three-section hero sections, looking like SaaS but lacking any specific product character.
So I stopped telling the model to be "more sophisticated" or "more designed." Instead, I decomposed aesthetics into stances.
A stance is not a style name; it's a design persona:
- What industries and scenarios it fits.
- What typographic relationships to use.
- How primary, secondary, and accent colors are assigned.
- Whether the page density should be high or low.
- Whether the layout should be stable or dynamic.
- Whether motion should be restrained, elastic, mechanical, or cinematic.
- What elements must never appear.
After abstraction, it looks something like this:
type AestheticStance = {
  id: string;
  useWhen: string[];
  avoidWhen: string[];
  palette: {
    background: string;
    ink: string;
    muted: string;
    accent: string;
    surface: string;
  };
  typography: {
    display: string;
    body: string;
    rule: string;
  };
  motion: {
    rhythm: string;
    easing: string[];
    antiPattern: string[];
  };
  composition: {
    density: number;
    variance: number;
    preferredLayouts: string[];
  };
};
For instance, for the same "product launch hero," different stances produce radically different outcomes:
Minimalist Editorial leans toward restraint, whitespace, and clear text hierarchy.
Glassmorphic Tech favors dark tones, refraction, subtle springiness, and spatial depth.
Kinetic Poster lets large typography occupy 70% of the canvas, emphasizing cuts, scroll, offset, and rhythm.
Organic Nature tones down color, shape, and motion to create a breathing, handcrafted feel.
The value of this step is turning "taste" from a comment into a system that the model can choose, inherit, check, and locally override.
Of course, rules cannot replace taste.
But without rules, it's hard for a model to consistently inherit your taste.
Later I turned some obvious AI-isms into anti-patterns: default indigo, cheap purple-blue gradients, emoji as icons, fake metrics, placeholder copy, layers without semantic IDs. Where possible, I added linting; otherwise, I wrote them into a reviewer checklist.
This isn't about turning design into rigid rules, but about establishing a minimum aesthetic floor for the model.
Only after avoiding low-level mistakes can you make that 20% of unique choices.
Layer 4: Full Tool Exposure — So the Model Really Uses the Editor
Many Agents perform poorly not because the model isn't smart, but because the tool interface is terrible.
The editor has pen, path, mask, boolean, group, keyframe, camera, background, TextFx, GLSL, icon, 3D, and user assets — but the Agent only sees coarse tools like add rectangle, add text, modify element. Naturally, it can't perform real design actions.
I fell into a typical pit: the system prompt claimed a tool was available, the tool registry registered it, but the frontend client tools whitelist wasn't synced and the bridge handler wasn't wired up. The model called it, but the UI never executed.
This kind of problem is deadly in Harness.
So tool registration must become the single source of truth.
A tool is not just a function name; it should have complete metadata:
type AgentToolMeta = {
  name: string;
  category: "canvas" | "asset" | "analysis" | "generation";
  modes: Array<"agent" | "animation" | "image">;
  mutating: boolean;
  needsApproval?: boolean;
  costLevel: "free" | "credit" | "expensive";
  useWhen: string;
  doNotUseWhen?: string;
  returns: "canvas-diff" | "asset-list" | "plan" | "diagnosis";
};
The most critical part here is mutating.
Chat, search, analysis, and skill queries can be open. Operations that actually modify the canvas, generate assets, consume credits, or write project state need permissions, plan gates, user confirmation, and rollback.
This aligns with OpenAI's approvals and state documentation, as well as Anthropic's concepts of checkpoints and human feedback.
Design tools also have a special category of tools: asset discovery.
The model shouldn't generate everything from scratch every time.
It should first ask: Are there existing TextFx effects? GLSL shaders? Icons? Recently generated images in the user's project? Reusable 3D models, materials, HDRI?
So I treat assets as part of the tool ecosystem:
type AssetSearchQuery = {
  type: "icon" | "textfx" | "shader" | "user-image" | "model" | "material" | "all";
  query: string;
  projectId?: string;
  limit?: number;
};
The reasoning behind this design: reuse is not laziness; reuse is a design workflow.
A truly usable Design Agent should not only generate but also find, select, combine, and inherit project assets.
Layer 5: Editable Protocol — The "Aha!" Moment
This might be my core insight about Design Harness.
If the model only outputs an image, no matter how beautiful it is, it's just a result.
If the model outputs an editable design tree, then it enters production.
So the generation path must not only pursue visual similarity but also preserve semantic structure.
In KinoViz, I explored the HTML → SVG → Fabric.js scene pipeline. I won't go into implementation details here; just the idea: let the model first express structure with constrained HTML, then map the DOM to SVG via semantic markers, and finally restore SVG / role / tone / animation into a Fabric.js scene.
A conceptual snippet looks like this:
<div
  data-kv-id="hero-root"
  data-kv-group="hero"
  data-kv-layout="stack"
  data-kv-tone="background"
  style="display:flex; flex-direction:column; gap:24px;"
>
  <span
    data-kv-id="hero-eyebrow"
    data-kv-role="eyebrow"
    data-kv-tone="accent"
    data-kv-anim="fadeInDown"
  >
    PRIVATE BETA
  </span>

  <span
    data-kv-id="hero-headline"
    data-kv-role="headline"
    data-kv-tone="ink"
    data-kv-anim="fadeInUp"
  >
    Ship faster with signal
  </span>

  <span
    data-kv-id="hero-cta"
    data-kv-role="cta"
    data-kv-tone="accent"
    data-kv-emphasis="true"
    data-kv-anim="scaleIn"
  >
    Start free trial
  </span>
</div>
The point here is not HTML.
It's the semantic protocol layer represented by data-kv-*.
data-kv-id provides a stable anchor for subsequent editing and testing.
data-kv-role tells the system whether this is a headline, subtitle, CTA, price, metric, or feature item.
data-kv-group and data-kv-layout tell the system which elements belong to the same semantic group and how to form layers and stagger.
data-kv-tone is color semantics, not a color value. The model can say this is accent, but the actual accent comes from the brief palette. This way, when the user switches stances, the structure stays intact and the visuals can be entirely recalculated.
data-kv-anim only references presets, preventing the model from writing a bunch of uncontrollable animations.
That's what I call an "editable protocol."
It turns AI output from a flat image into an intermediate representation that can be restored as design tool objects.
And that's where the reader should have their "aha!" moment:
The true Design Harness doesn't make the model draw the final image directly; it makes the model produce a structure that a design tool can understand.
Layer Six: Motion Harness – Harder Than Static Design
Static design is already difficult; motion design is even harder.

Because motion introduces time.
With time comes a host of new problems: keyframes, timing, delays, camera moves, stagger, easing, loops, pauses, reduced motion, flicker thresholds, and export consistency.
I take a restrained view of motion: it is not decoration. It should serve space, time, and state changes.
For example, when an element enters, the user should better understand the information hierarchy.
When a card expands, the user should grasp the spatial relationship.
When a state completes, the user should receive feedback, not be interrupted by a performance.
Therefore a motion Harness must contain at least four components.
First, Plan Preview.
For complete creative tasks, the model should not modify the canvas immediately. It should first present a plan: background, camera, elements, entry order, total duration, motion personality, and questions for the user to confirm. Execution only happens after user confirmation.
Second, Motion Budget.
Each type of motion must have a duration and intensity budget. Button feedback, state confirmation, entry animations, and screen transitions should not share the same rhythm. Frequent actions should be short, showcase animations can be longer, and looping motion must be stoppable.
Third, Keyframe Sanity Check.
After generation, check whether the canvas is empty, keyframes are missing, durations are abnormal, an element has dozens of meaningless keyframes, and whether there is excessive flickering.
Fourth, Export Parity.
What looks correct in the editor does not guarantee correct export. Fabric rendering, background sampling, filters, glass effects, nested groups, masks, DPR, and video export can all go wrong. The motion Harness must care about consistency between the editor preview and the final export.
A simplified checker might look like this:
const designChecks = [
  "canvas_is_not_empty",
  "all_visible_elements_have_semantic_id",
  "headline_uses_stance_display_font",
  "no_default_ai_indigo",
  "no_placeholder_copy",
  "animation_duration_within_budget",
  "no_flash_more_than_3_times_per_second",
  "keyframes_exist_for_animated_elements",
  "editor_preview_matches_export_snapshot"
];
This is not project source code, but an illustration of an approach:
Break down “it doesn’t look right” into as many checkable items as possible.
Some aesthetic judgments cannot be automated, but many low-level errors can.
If you can catch 60% of low-level errors, human polishing can focus on real design decisions.
Validation Loop: Don’t Leave All Evaluation to the Model
Agent products often fall into the trap of believing in “AI self-reflection”.
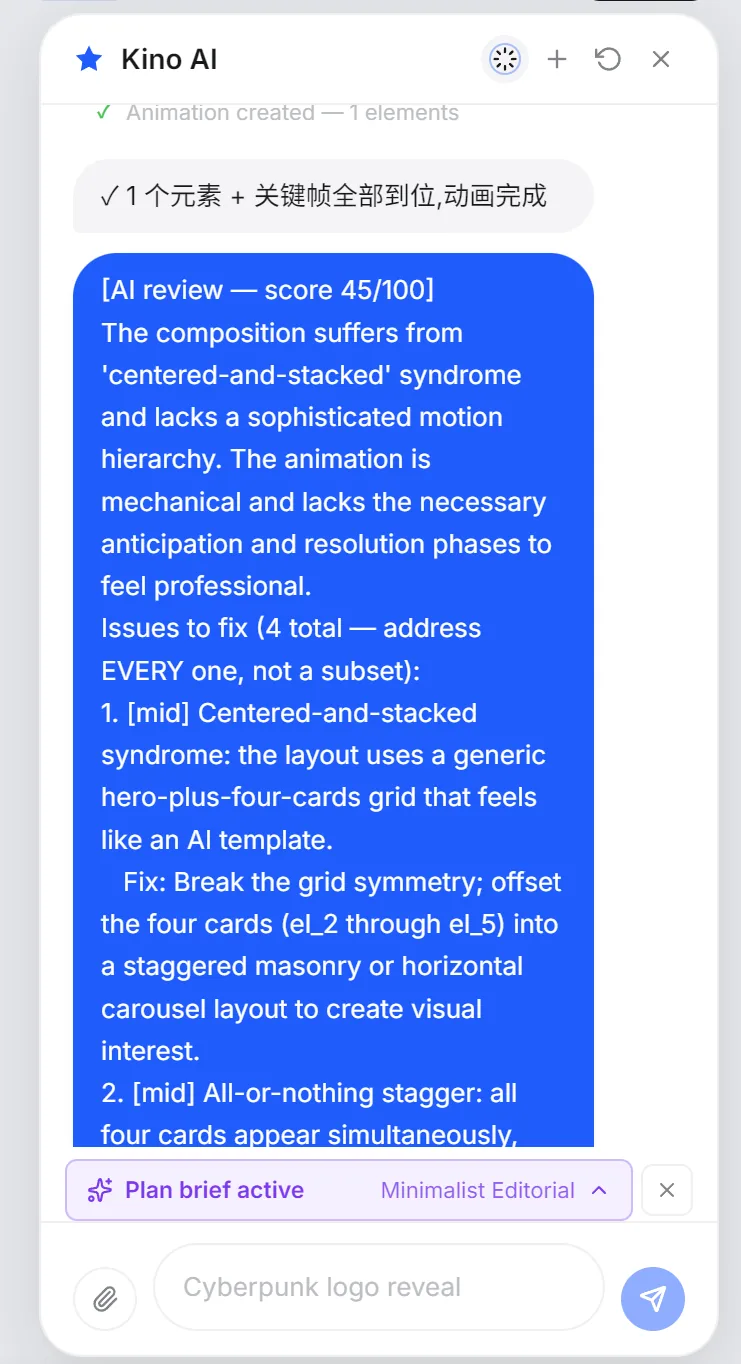
Self-reflection is useful, but it is not a cure-all.
Especially in design scenarios, models sometimes confidently explain a poor result. Ask it to evaluate itself, and it will give you a plausible justification, but the visual output still looks wrong.
So I lean toward hybrid validation:
Rule checks catch clear errors.
Screenshot and pixel checks catch rendering discrepancies.
E2E tests catch toolchain breaks.
Human polishing handles taste judgments.
Model review only steps in where it excels—explaining problems, suggesting modifications, generating alternatives.
This is very close to what Anthropic describes for long-running agents: long tasks rely on feature lists, incremental progress, clean state, progress files, and end-to-end tests to keep the Agent reoriented. Design tasks need the same, except the test subjects are canvases, layers, screenshots, and exports.
My takeaway:
Harness is not about giving the Agent unlimited freedom.
Harness is about giving the Agent a track on which to work freely.
What Other Industry Concepts Can Be Brought In?
The Design Harness I am building now is not the final state.
Going deeper, several existing industry directions are worth integrating.
First, Eval Harness.
When Anthropic talks about agent eval, they emphasize evaluating the combined result of the model and the harness. A design Agent should also have its own eval: generation quality, editability, tool hit rate, rollback success rate, export consistency, number of user re-edits, and human polish cost.
Second, Sandbox / Execution Separation.
OpenAI’s sandbox agents documentation stresses that the harness can run in your infrastructure while the sandbox handles stateful execution. Design tools face a similar issue: Agent decisions, tool execution, file export, and user asset access should have clear boundaries to prevent a single tool call from having too broad an impact.
Third, Memory Governance.
Project brief is one form of memory, but future possibilities include brand memory, team design system memory, and user preference memory. The challenge is not remembering as much as possible, but deciding what to remember, when to remember it, how to expire it, and how to make it editable by users.
Fourth, Subagent / Specialist.
Complex design tasks can be broken into multiple specialists: brief analyst, layout designer, motion designer, asset finder, reviewer, export verifier. But I do not advocate multiple agents for the sake of it. It is only worthwhile when the task is too complex for a single Agent to handle reliably, or when parallel exploration and cross-validation are genuinely needed.
Fifth, Trace / Observability.
Design Agents will ultimately need observability. Why was a particular stance chosen for a generation? Why was a certain tool invoked? Which check failed? What step consumed the most time? At what point did the user cancel? All of this should enter the trace.
These can all be added as engineering supplements.
But I will follow one order first: stabilize the single-Agent Design Harness, then move on to multiple Agents and heavier orchestration.
My Current Conclusion on Design Harness
The core of Design Harness is not “helping the model write a longer prompt.”
It is an external system that enables the model to enter design production.
It must answer six questions:
How does the model understand the goal?
How does the model inherit aesthetics?
How does the model know what tools it has?
How does the model preserve generation results as an editable structure?
How does the model handle time and motion?
How does the model validate, roll back, export, and continue iterating?
If these questions have no answers, AI design tools will remain stuck in the “generator” phase.
If these questions have engineering answers, AI can move from “can generate” to “can deliver.”
This is my biggest takeaway from working on KinoViz:
I am not just building an AI animation tool.
I am studying the Harness for design Agents.
Effects are surface; structure is depth. The model is the engine; the Harness is the entire vehicle.
Models will continue to improve, but the engineering outside the model will become increasingly important.
Whoever can connect model capabilities into real workflows will push AI from “looks amazing” to “actually works.”
That is where Design Harness is most worth investing.
Still Not Perfect
Currently, the AI Agent is in Beta, still being refined, and it requires GPT-5.6 or above, making costs hard to reduce. Therefore, current point consumption is high.
If you are also exploring an editable AI animation workflow, you can start from KinoViz Studio and continue validating this Design Harness approach in real projects.